
There are many products that everybody can buy - smart hubs, home automation kits, smart home solutions.
Here I will write how you can create by your own one home or even company automation solution. Why we need this, because we can control our "things" remotely and we can check if something is turned on/off when we are not at home.
The idea of all automation kits is that you have additional relay between the consumer - for example one lamp and the electrical network. This switch is connected or managed by computer, and in this case we know at any moment what is happening with this elektric consumer.
The easiest solution is just to create one web application, connected with python scripts, which are controling the ports of the PIFace.
I found interesting topics with info:
- Simple home automation with the Raspberry Pi
- Ten essential Raspberry Pi projects
Here we will use different way for communication between web interface and the server.
I have already described the first steps - Internet Of Things - publishing messages and inserting the data into database
Why I am using this solution - because in this case, we can connect different servers with publishing/subscribe method.
First we need some logic in the scripts and messages.
This is one example of the message:
<control><data num="1" val="1">relay</data></control>
Now we need the subscribing script:
import paho.mqtt.client as paho
import time
from time import gmtime, strftime
import os
import ssl
from xml.etree import ElementTree as ET

mqtthost = "server"
mqttuser = "user:vhost"
mqttpass = "password"
mqtttopic = "demoexchange"

def on_subscribe(client, userdata, mid, granted_qos):
    print("Subscribed: "+str(mid)+" "+str(granted_qos))

def on_message(client, userdata, msg):
    tree = ET.fromstring(msg.payload)
    control = tree.find('.//data')
    os.system("python rcontrol.py "+control.attrib['num']+" "+control.attrib['val'])

client = paho.Client()
client.on_subscribe = on_subscribe
client.on_message = on_message

client.username_pw_set(mqttuser,mqttpass)
client.tls_set("certs/ssl.pem", cert_reqs=ssl.CERT_REQUIRED, tls_version=ssl.PROTOCOL_TLSv1)
client.connect(mqtthost, 8883,60)

client.subscribe(mqtttopic, qos=1)

client.loop_forever()
With this python script, we are subscibing to a topic named "demotopic", parsing the xml message and taking the values of attributes - num and val.
After we get the values of these two parts of xml, we are passing these arguments to rcontrol.py. In it, we are using the pifacedigital:
#!/usr/bin/python
import sys
import pifacedigitalio as p

p.init()
p.digital_write(int(sys.argv[1]),int(sys.argv[2]))
print("send value "+str(sys.argv[2])+" to relay "+str(sys.argv[1]))
Till now we have created the executive/subscriber part. Now we need the web/publish one. And here it is.
<?php
 use PhpAmqpLib\Connection\AMQPSSLConnection;
 use PhpAmqpLib\Message\AMQPMessage;
  function publishQueue($routingKey,$key,$val){
    $exchange="demoexchange";
    $ssl_options = .....;
    $connection = new AMQPSSLConnection('server', port, 'user', 'password','vhost', $ssl_options);
    $channel = $connection->channel();
    $messageBody = <<<EOT
<control><data num="$key" val="$val">relay</data></control>
EOT;
    $message = new AMQPMessage($messageBody);
    $channel->basic_publish($message, $exchange, $routingKey);
    $channel->close();
    $connection->close();
  }
if(isset($_POST['l1on'])){
  publishQueue('rcontrol',1,1);
}
?>
<!html>
<html lang="en">
<head>
<meta charset="utf-8">
<meta http-equiv="X-UA-Compatible" content="IE=edge">
<meta name="viewport" content="initial-scale=1, maximum-scale=1, user-scalable=no, width=device-width">
<title>remote contro</ltitle>
<link rel="shortcut icon" href="favicon.ico">
<link href="bootstrap.css" rel="stylesheet" type="text/css">
</head>
<body style="text-align:center;"><br>
<form method="post" action="">
<h4 style="color:#000;text-align:center;">Remote Lamps</h4>
<br>
<button type="submit" class="btn btn-success waves-effect" name="l1on">Turn Lamp1 On</button>
<button type="submit" class="btn btn-danger waves-effect" name="l1off">Turn Lamp1 Off</button>
<br><br>
<button type="submit" class="btn btn-success waves-effect" name="l2on">Turn Lamp2 On</button>
<button type="submit" class="btn btn-danger waves-effect" name="l2off">Turn Lamp2 Off</button>
</form>
</body>
</html>
This is only a sample.
The working solution is made with additional feedback about the state of the relay - if it is on or off. The status is published back and taken with the php subscribe method.
Everything is stored in a json file on the webserver.
Here is a sample of the file:
[{"server":"servername","info":"Kitchen pi","data":[{"info":"Boiler kitchen","output":"0","val":"1"},{"info":"Lamp kitchen","output":"1","val":"0"}]},{"server":"server2name","info":"Basement pi","data":[{"info":"Lamp nearby bed","output":"0","val":"0"},{"info":"Lamp coridor","output":"1","val":"1"}]}]Here you can add as much servers(raspbery pi/arduino uno), as you wish.
Update of the status is made by matching the server and output number of the relay.
Finally, here is a sample of the web control page:
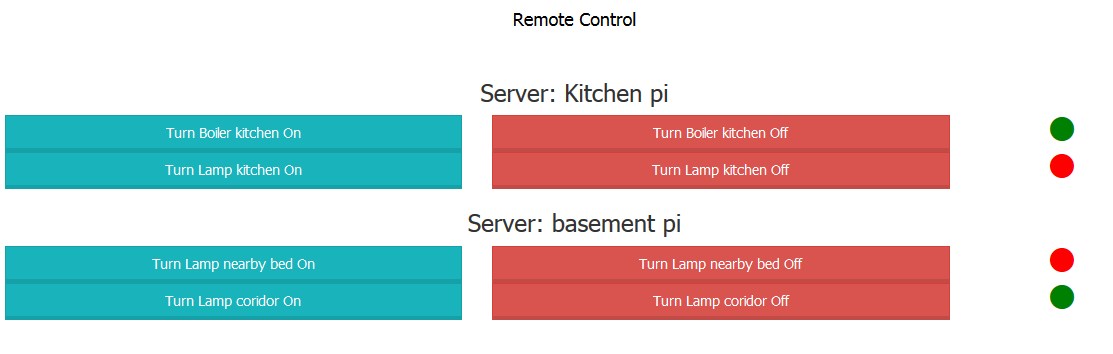
try this application